Fall is the perfect time to prepare your garden for the upcoming seasons. Working on your perennial and flower beds now will pay off in the spring with healthier plants, better soil quality, and easier garden maintenance. Whether planting new perennials, dividing existing ones, or simply preparing your garden beds for the winter, a few simple steps can ensure your garden thrives when the weather warms up again.
Step 1: Dig and Amend the Soil
Healthy soil is the foundation of a beautiful and productive garden. Start digging into the soil to a depth of about 6-10 inches. This process, known as double digging, aerates the soil, improves drainage, and ensures that plant roots can grow deep and access necessary nutrients. As you dig, remove any weeds, rocks, or debris hindering plant growth.
Once your soil is loosened, it’s time to amend it with organic matter. Adding compost is one of the best ways to improve soil quality. You can use options like Leaf-Gro, mushroom compost, or peat moss to add essential nutrients, improve soil structure, and increase water retention. These organic materials enrich the soil, ensuring your plants get the nutrients they need to grow strong and healthy.
By incorporating organic matter into the soil in the fall, you’re giving it time to break down over the winter, enhancing the soil’s fertility by the time spring arrives.
Step 2: Create Clean, Defined Edges
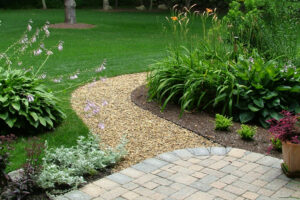
Once your soil is prepped and amended, the next step is to edge your garden beds. Use a sharp edging spade to create a clean, defined edge around your garden beds. This not only improves the appearance of your garden but also helps prevent lawn grass and weeds from creeping into the beds. A well-defined edge is a barrier, reducing the maintenance required throughout the year.
Take your time to create smooth, even edges along your garden beds. The extra effort in creating sharp lines around your flower beds will enhance the overall look of your garden, making it appear tidy and well-maintained.
Step 3: Top Off with Mulch
After edging your garden beds, finish your fall preparation by applying a fresh layer of shredded mulch. Mulch serves several vital functions in your garden. First, it helps retain moisture in the soil, essential during winter when the air is dry and temperatures drop. Second, mulch acts as an insulating blanket, protecting the roots of your plants from harsh winter conditions.
Applying 2-3 inches of mulch over your garden beds is a good rule of thumb. Spread the mulch evenly, not piling it up against the base of your plants, as this can cause rot. Instead, create a small ring of space around each plant.
Mulching also helps suppress weeds, reducing the need for weeding in the spring. Additionally, as the mulch breaks down, it adds valuable organic matter to the soil, further enriching it for future growth.
By taking the time to dig and amend your soil, edge your garden beds, and apply fresh mulch, you are setting the stage for a vibrant and healthy garden next year. Fall garden bed preparation ensures that your perennials and flowers have the best chance to thrive when spring returns. A little effort in the fall goes a long way toward creating a garden that will reward you with beauty and enjoyment throughout the growing season.